Monday, December 13, 2010
Yoda Complete
And one last note from Yoda...
Tuesday, September 7, 2010
Continuing Yoda
I finally got the ears on. I have to say they turned out great! I knit a triangle with a flat side (called a right triangle by those with smarts.) Then I rolled each edge over tightly rolled foam and stitched them down. Added a bump in front of where the ear canal should be. 'Really' smart people call the bump the tragus. {I had to look it up. Me not that smart.} Cool name -- TRAGUS! | |
This is the long row of triangles that form the hair. I had to do a few trials to find a procedure that worked right. The final was: CO 10 ** Turn K10 Turn K10, CO 6 Turn K16 Turn K16, CO 3 Turn BO 3, K16 Turn K16 Turn BO6, K10 Turn K10 Turn BO 8, K2 Turn K2, CO 8 Repeat from ** Until nap-time... Make smaller ones on the end. Use your best judgment. I did... | |
I stitched on the hair and realized I'd seen this somewhere else. Not just the movies or the cartoon, but somewhere closer. | |
Yoda has my hair line. He's such a lucky guy!!!! I'm just glad I don't have ears like his. It'd be hard getting in the car... |
Tuesday, August 24, 2010
Friday, July 30, 2010
Creating Yoda
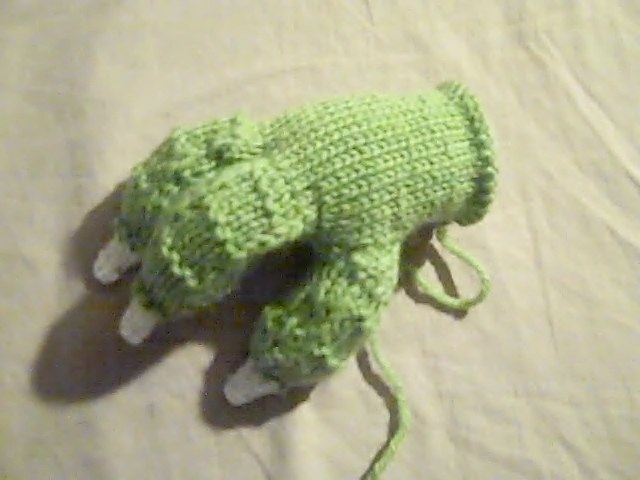
I decided to start with the hand to judge size and see if I should start this project at all. There is no pattern. I'm just taking it one part at a time. I like the knuckles. I added a purl row on the outside to show the bend. | |
This is the foam fore the inside of the head. I make puppets so this wasn't a hard part. Just some contact cement and some foam. The problem with contact cement: Don't buy the plastic container of it and leave it in the car (on its side and in the summer) to see a movie, before you go home. The cement will expand, seep out and pool on the back seat of your car. Not only does this raise the blood pressure, but the smell doesn't leave the car for a few days. Like driving under the influence is bad enough... | |
![]() | A few weeks go by and ... viola! A great start. Very happy with the eyes. Under each feature in the face are layers of foam. This is starting to look like the intended ... what is Yoda? According to Wikipedia: "Unknown Species". I would list him as a frankozian. ;) |
![]() | After adding the brow and nose, I feel the force. This is turning out way better than I expected. Stay tuned for the rest of the adventure.... |
Monday, May 24, 2010
Tuesday, May 18, 2010
Tuesday, February 23, 2010
Mutt-astic Sweater

This sweater is on my mom's dog Murphy. She showed me the one she made in crochet and I had to make one for him in knit.
It hugs him a little snug, but I think it fits him well. I've got some bigger stuff I've been working on for a while so that's coming up soon.
Sorry, it's been a while...
Friday, November 20, 2009
Monkey Finger Puppet
I made this for a mom. She had a son in the hospital, saw one like it and asked if I could make a similar toy. This is what I came up with. I wrote the pattern for it in case someone would want one for themselves.
Monkey Finger Puppet
Body:
CO 18st in Brown and join in the Round on 3 DPNs
K 14 rows
(K4, K2tog) 3 times (15st)
K 1 Row
(K3, K2tog) 3 times (12st)
K 1 Row
(K2, K2tog) 3 times (9st)
(K1, K2tog) 3 times (6st)
Cut Yarn, stitch through remaining 6 stitches, and pull tight. Tie off and weave in ends.
Arms (2 needed):
Make I-cord with Brown (using the 3 stitches method) 8 Rows long.
Embroider with Light Brown “palms” on one end of each of the Arms.
Ears (2 needed):
Make I-cord with Light Brown (using the 3 stitches method) 7 Rows long.
Face:
CO 7st in Light Brown
Knit 4 rows
BO by K2TBL place stitch back on the left needle and K2TBL. Repeat.
This will leave a ridge for the brow above the eyes.
Nose:
CO 18st in Light Brown and join in the Round on 3 DPNs
K 9 Rows
Cut Yarn, stitch through 18 stitches, and pull tight. Tie off and weave in ends.
Using the Starting Yarn Pick Up the CO rows and pulltight. Tie off and weave in ends.
Tail:
Make I-cord with Brown (using the 3 stitches method) 8 Rows long.
To Make up:
Stitch the Face in place then stitch the Nose in place on the bottom row of the face. Take each end of the I-cord for the Ears and stitch them in place on both sides of the head forming loops. Stitch the Arms in place and the tail. Embroider the nose holes and eyes with a long strand of Black. Do the same for the mouth using a long strand of Pink.
Eeyore toy
I finally got the Eeyore toy made for my friend and I think he turned out great. I knitted each piece up with undyed sock yarn and dyed them with Kool-Aid. It was received with joy. The pattern can be found here: Just go to the bottom of the page to find the pattern.
Friday, October 16, 2009
Happy Face...
Tuesday, October 13, 2009
A Sock, a Bear, and a Note...
After many weeks I have finally finished another pair of socks for myself. The pattern can be found here: hedgerow socks as a pdf. I adjusted the pattern by adding the Fleegle Heel, which is an easy heel. I like to sock, but I hope it shrinks a little in the wash. I made it a little loose. (Gauge gets you every time!)
![]() | ![]() |
![]() | ![]() |
The eyes are something I came up with. I made seven stitches around where the eyes should be then, stitched from the corners of those seven to the center of the eye. It looked like a wagon wheel with seven spokes. Then, I weaved yarn from the center out (over and under the spokes). You have to have a odd number of spokes or the weave doesn't happen . Then, I tied a french knot for the pupil and added a highlight with some white.
![]() | Note: Dear Mr. Tommy, Thank you for making my mouse with the sack of berries. I have a lot of fun with it. All the mice and the fox are in my bedroom on my windowsill. Some of my friends have said they would like mice of their own. We have all played with the mice and loved it! I've never had stuffed animals like these before. They are the best! I think you are the best friend anybody could have in the world. I love you, Savannah |
Don't that just beat all!
Tuesday, October 6, 2009
Please let this be the last mouse...
Friday, September 25, 2009
What the blank...
I bought a few packets of different powdered drink mixes and some dye-able yarn from KnitPicks .

I knit up a blank from the yarn, then cut a large square from a plastic grocery bag (I didn't have anything else available and it sounds more green. Recycle baby!) I placed the yarn blank in some warm water and started the mad scientist routine.

2. Place the moist yarn blank on the plastic
3. Pour the mix onto the yarn blank
4. Wrap the plastic around the yarn blank
5. Put it in a sandwich bag (do not seal)
6. Microwave for a minute
7. Let set for a minute
8. Microwave for a minute
9. Let set for a minute
10. Microwave for 2 minutes
11. Let it cool. Take out the yarn and wash it in dish soap and warm water
12. Hang up to dry.
I'm happy with the results. There will be something that comes from this experiment!!!
And, in case you need to know, that is a Dr. Horrible little pony! I found it online with some other little pony modification images. This just had to be shared! They have a Captain Hammer, too!
Thursday, August 20, 2009
The Alligator & the Elephant (Alli & Ele)
Alli:
Ele:
Wednesday, August 12, 2009

This was a hard pattern to come up with. I made each shape separately, then hooked the loops together with a crochet hook (around the black Pentagons)and stitched through the loops between the white polygons. Here's the pattern, I you want to try it.
Knitted Soccer Ball by Tommy Smith
Black Pentagon (make 12):
CO 5 sts and join in the round
K 1 row (If you used the Long-Tail Cast On Skip this row)
KFB into every stitch [10 sts]
K 1 Row
(K1 YO K1) x5 [15 sts]
(K1 KTBL K1) x5 - this twists the YO from the previous row
K 1 Row
Cut yarn leaving a long tail. Using a tapestry needle and the tail from the beginning Cast On, thread through remaining live stitches on the needle. Do not pull tight this will be removed later.
White Hexagon (Make 20):
CO 6 sts and join in the round
K 1 row (If you used the Long-Tail Cast On Skip this row)
KFB into every stitch [12 sts]
K 1 Row
(K1 YO K1) x6 [18 sts]
(K1 KTBL K1) x6 - this twists the YO from the previous row
K 1 Row
Cut yarn leaving a long tail. Using a tapestry needle and the tail from the beginning Cast On, thread through remaining live stitches on the needle. We will call this the safety yarn. Do not pull tight this will be removed later.
To finish, place a Black Pentagon in the center of 5 White Hexagons. Using a crochet hook, pick up one loop from the edge of the Black Pentagon (at the end of your last stitch) and pick up one loop from the edge of a White Hexagon. Pull the loop from the White Hexagon through the loop from the Black Pentagon. This will leave the loop from the White hexagon on the crochet hook. Now hook the next loop on the Black Pentagon and pull it through the loop on the needle. Continue this until 3 loops from each color have been captured. Pick up another White Hexagon and continue the procedure for 3 more loops. Repeat until the Black Pentagon is surrounded with the 5 White Hexagons. Use the long tail to secure this loop. The safety yarn can be removed from the Black Pentagon.
Using the diagram below, connect all your pieces. Remove the safety yarn when the Hexagon or Pentagon is fully attached. Before you finish the last row, stuff with filling.
Tuesday, August 4, 2009
Here's the Nurse Mouse. I have made 2 of these and this one is the better of the 2! I was trying to balance the mice and turn them to show the 360 view. It was raining and I was in a hurry... So you get the falling mice babies view...
Got a Soccer Ball coming real soon. Maybe even today, if I can get some computer time at work... :o)
Tuesday, July 21, 2009
Castle Mouse
Video of the latest Mouse from Alan Dart's pattern. I got a new camera. It's a Flip.
I have been impressed with it so far. Back to the mouse: I used a bamboo skewer for the pole and I put a gold bead on the end. The pattern on his shirt is stitched in after the fact. This was my third time doing that method and I still need practice, but it still looks nice. I now have another request for the Nanny mouse. So pictures or video will soon come!!!
Monday, June 29, 2009
Mom's Sock (with the Fleegle Heel)

I got this yarn on a trip to Stitches South. It was free! Universal Yarn hosted the trip and they had prizes for everyone. This is Universal Yarn Bamboo Sock . I got it free but the price online is cheap, and I have enough to make a set of footies.
Mom liked them a lot. It's so good to see someone enjoy a pair of hand knit socks. She was surprised by how good they felt on her feet.
The pattern was a standard sock design: size 2 needles, loosely CO 64 ( I used long tail and size 3 needles for this) , make 2 inches of 2 x 2 ribbing and start the pattern. The pattern is a odd basket weave I found in a pattern book that worked for 64 stitches. Then the good part:
The Fleegle Heel!I am so impressed with this style of heel that I don't think I will ever knit a different style. I have been so frustrated with the Short Row Heel and I never liked the Heel Flap. I have finally found the heel for me! It is comfortable and there are NO HOLES!!!!!!
Now I have to find the best toe and I can settle back and be happy with my socks.
A Spider For My Brother

I'm not sure why he wanted it, but I'm always up to a challenge. You can't see it clearly in the photo: there's a heart on the Black Widows back instead of the usual hourglass. It was a final change that I jokingly suggested and he said it would be cool and different.
I put pipe cleaners in the legs to give them the ability to pose And the eyes are beads I sewed in with standard thread. I warned my brother that this wasn't a kids toy (may cause choking hazard.)
The picture was taken by my cell phone and edited with picnik. Its a free photo editing site one of my youth kids told me about. I like it.
Helpful Videos
Facebook & Ravelry
Free Knit Patterns
Knitting Blogs I Like
-
1 day ago
-
6 years ago
-
13 years ago
-
13 years ago
-
14 years ago
-
14 years ago
-
16 years ago
Non-Knitting Blogs I Like
-
7 years ago
About Me
- Tommy
- Kannapolis, NC, United States
Posts
- Fox (1)
- Knitting (20)
- Pattern (7)
- Soccer Ball (1)
- Video (3)
Yes I Knit © 2008


